Configuring a guest session on Linux Mint
Physically sharing computers with other people can be a challenge. While they only need temporary access to access the web, work on some files or even play a game, this may impose a security risk. For example, your personal files may be accessible because your account is already logged in. While on one hand you want to share your device, on another hand you may also want to some privacy.
If this is a concern for you, keep reading. We will see how to use guest accounts on Linux Mint and how to customize them for your needs.
Activate the functionality
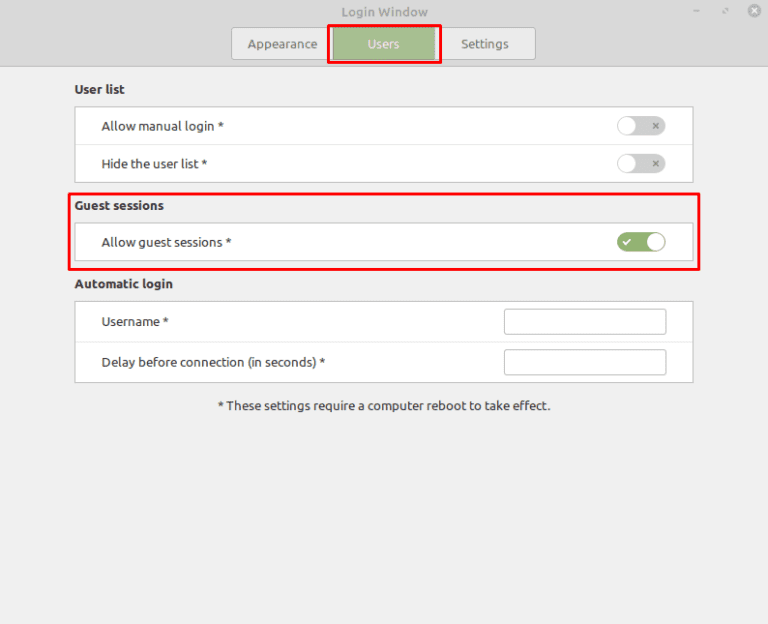
For Windows users, this functionality is integrated since Windows XP, however newer versions of the OS require some tricks. For Linux Mint, this functionality is also present via lightdm display manager. Just search for “Login Window” on the menu and enable the option “Allow guest sessions” under “Users” tab.
This creates a special entry on login screen which will start a fresh session every time the “guest session” login is used. By fresh, it means a temporary user account is created and then deleted on logout, along with all created files. This is great because it protects both the guest and your privacy, with the bonus of removing unnecessary files from your system.
Customize the behavior of guest session
Another interesting aspect of the lightdm account functionality is the customization of the session. By default, the account starts with a default desktop image without icons. However, you can create custom files that will be copied over the new guest session folder. As you may know, in Linux a file is an important concept of the system. There is no surprise that usually configuration is stored inside files. By copying custom configuration files to the new session home folder, we are able to customize the behavior of the guest session.
Unfortunately there seems to exist a lack of documentation about this functionality. My goal with this article is to let you know how the guest account system works and how to customize it for your needs.
How it works?
Take a look at the guest account controlling script from lightdm. Under the add_account function you can see that in fact a new home folder is created for the new session using mktemp program.
add_account ()
{
  temp_home=$(mktemp -td guest-XXXXXX)
  GUEST_HOME=$(echo ${temp_home} | tr '[:upper:]' '[:lower:]')
  GUEST_USER=${GUEST_HOME#/tmp/}
  if [ "${GUEST_HOME}" != "${temp_home}" ]; then
    mkdir -m 700 "${GUEST_HOME}" || {
      echo "Failed to create ${GUEST_USER}'s home directory (${GUEST_HOME})"
      exit 1
    }
    rmdir "${temp_home}"
  fi
After some sanity checks, we can see that there are two base folders where files are retrieved from to customize the new session:
dist_gs=/usr/share/lightdm/guest-session
site_gs=/etc/guest-session
Each of these folders may contain a skel folder inside, where the custom files will reside. The process will start by copying the files from site_gs directory and the from dist_gs meaning the latter will override all previous customizations.
Let’s then start with a simple test. Under the dist_gs directory, open the skel folder and create a simple text file named test.txt. Save it with any contents you like. Then logout and start a guest session. Open the file directory and check that the file is there. You may edit this file on guest session or even delete it, but remember that when a new guest session is started, all contents of skel folder will be copied again, creating a fresh account on every login.
Auto start an application
Now that we know how to add configuration files to the guest session home folder, let’s allow an application to launch after guest login. Usually people want to access some browser to navigate the Internet, so let’s configure Firefox to start automatically. Linux Mint also supports autostart applications out of the box. On the file system, this configuration is stored under ~/.config/autostart, containing a .desktop file for each autostart entry. To launch the Firefox at guest session startup, you need to create the respective file.
Go back to the /usr/share/lightdm/guest-session/skel directory. This is the base directory corresponding to the new guest home directory. Create a new directory for autostart:
mkdir -p /usr/share/lightdm/guest-session/skel/.config/autostart
Then, create a new file named firefox-auto-launch.desktop with this content:
[Desktop Entry]
Type=Application
Exec=firefox
X-GNOME-Autostart-enabled=true
NoDisplay=false
Hidden=false
Name[en_US]=Firefox
Comment[en_US]=No description
X-GNOME-Autostart-Delay=0
Save the file, and start a new guest session. You will notice that a new Firefox window appears. You can use any browser you like instead of Firefox. In fact, you can launch any program regardless being a browser or not.
If using Firefox or Chrome(ium), you can also setup a default website to load on startup. Just add it to the front of the executable name, eg.:
Exec=firefox https://example.com
When Firefox opens, the selected website will be loaded. Both Firefox and Chrome support a vast variety of command line flags (such as starting a private browsing session), giving you further customization possibilities:
Allow saving some files (just in case)
By further analyzing the guest-session-auto.sh we can also see an interesting hidden feature:
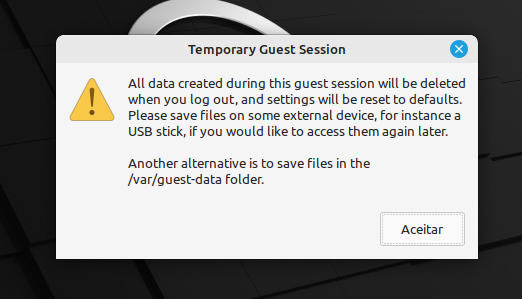
TITLE=$(gettext 'Temporary Guest Session')
TEXT=$(gettext 'All data created during this guest session will be deleted when you log out, and settings will be reset to defaults. Please save files on some external device, for instance a USB stick, if you would like to access them again later.')
para2=$(gettext 'Another alternative is to save files in the /var/guest-data folder.')
test -w /var/guest-data && TEXT="$TEXT\n\n$para2"
The dialog that always appears on guest login has an additional message that appear only if the /var/guest-data directory exists (contents of para2 variable). We can use this idea to persist some files and ensure they survive the home folder purge on guest logout. While the whole point of the guest session is to create a space where files only live temporarily, let’s say your guest wants to save some files for later, or want to share them with you so you can continue working on them on your own account.
Since the path is outside the guest home folder, the contents won’t be deleted. You can easily create this path and a shortcut at guest account desktop:
sudo mkdir -p /var/guest-data
cd /usr/share/lightdm/guest-session/skel/Desktop
sudo ln -s /var/guest-data 'Persisted data'
Login on guest account, confirm you have a shortcut ‘Persisted data’ at desktop and try to save a file inside. Logout, login again and check the file is still there. You can also access this file from your own account if needed.
An annoying alert
By this time, you may already logged in and out of your new guest session, and have been facing the same dialog over and over.
While this alert is indeed useful for the first time a new user log into the guest account, it may become frustrating over time. We’ve seen on previous section that it is created by guest-session-auto.sh script. Further analyzing the script you will notice the following snippet:
if [ ! -f "$HOME"/.skip-guest-warning-dialog ] && [ "$XDG_CURRENT_DESKTOP" != 'MATE' ]; then
This means that the alert will only be displayed if a file with name .skip-guest-warning-dialog does not exist. As you may already guessed, we can simply create this file on our skel directory which in turn will be copied to guest user home and prevent the creation of the dialog.