Traffic lights simulation using Arduino
An entertaining project for those who have some spare LEDs is an road intersection controlled by two traffic lights: one for the pedestrians and another for vehicles. Let’s use Arduino to start this project. The goal is to create a traffic light that automatically toggles at each 10 seconds, or manually by pedestrians.
Tools
- Arduino (Duemillanove, Uno or Leonardo)
- 5 LEDs (2 red, 2 green and 1 yellow/orange) + 5 resistors 330 Ω
- 1 switch button + 1 resistor 1 kΩ
- 1 buzzer + 1 resistor 330 Ω (optional)
- Breadboard and enough wiring to connect everything
Scheme
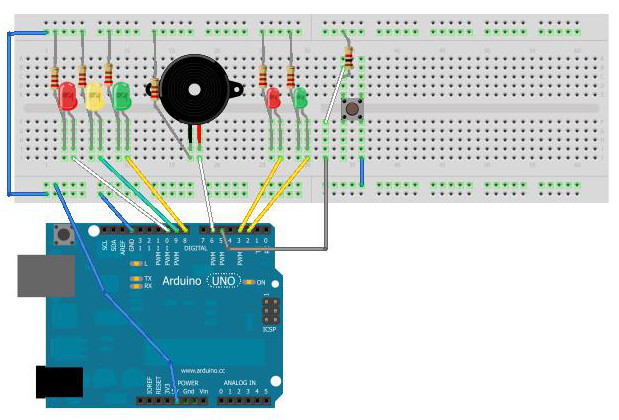
Assembly
- Put the car traffic light LEDs in breadboard (3 in total), as well as the resistors (all are 330 Ω). Make sure you connect the LEDs in right position and connect the groud connector to the resistor, which in turn should connect to Arduino ground. Later we will connect the LED positive to the Arduino digital ports.
- If you have a buzzer, place it after the LEDs. Connect the 330 Ω resitor to the negative side of buzzer and connect the resistor to ground, like we did on previous step
- You can now place the pedestrian traffic light (red and green) just like we did for the vehicles.
- Right now you should have 3 vehicles LED (red, yellow, green), a buzzer (optional) and 2 pedestrians LED (red and green). After the last LEDs, place the pedestrian button and connect it to the 1KΩ resistor, which in turns connects to ground. Connect the oposite wire to the Arduino power source (5V).
Let’s connect the wires which control the traffic lights to the Arduino digital ports.
- On the vehicle red LED positive, wire it to digital port 10.
- On the vehicle yellow LED positive, wire it to digital port 9.
- On the vehicle green LED positive, connect it to digital port 8
- If you are using a buzzer, connect it to digital port 6.
- Wire the button positive to the digital port 5.
- On the pedestrian red LED positive, wire it to digital port 3
- On the pedestrian green LED positive, wire it to digital port 2
That’s all for wiring. We can now connect the breadboard positive to Arduino 5V source, and the ground to Arduino’s ground. On the software side, you just need to upload the following code (you can also download it at the end of this article):
// variables to adjust the traffic light cycle
long cycle = 10 * 1000l; // 10 seconds
long last_cycle = 0;

// variables to countrol button behavior
int debounce_delay = 800;
int pedestrian_req = 0;
int req_state = 0;

// digital ports on Arduino
const byte PEDESTRIAN_GREEN = 2;
const byte PEDESTRIAN_RED = 3;
const byte BUTTON = 5;
const byte BELL = 6;
const byte CAR_GREEN = 8;
const byte CAR_YELLOW = 9;
const byte CAR_RED = 10;

// Bell sound for pedestrians
const byte NOTE_A6 = 1760;  // try to change for different sounds

/**
 * Startup routine
 */
void setup(){
  // pedestrians traffic light
  pinMode(PEDESTRIAN_GREEN, OUTPUT);
  digitalWrite(PEDESTRIAN_GREEN, LOW);
  pinMode(PEDESTRIAN_RED, OUTPUT);
  digitalWrite(PEDESTRIAN_RED, HIGH);

  // vehicles traffic lights
  pinMode(CAR_GREEN, OUTPUT);
  digitalWrite(CAR_GREEN, HIGH);
  pinMode(CAR_YELLOW, OUTPUT);
  digitalWrite(CAR_YELLOW, LOW);
  pinMode(CAR_RED, OUTPUT);
  digitalWrite(CAR_RED, LOW);

  // push button
  pinMode(BUTTON, INPUT);

  // last cycle
  last_cycle = millis();

  Serial.begin(9600);
}

/**
 * Loop routine to manage traffic lights
 */
void loop(){
  // button read with debounce protection - https://docs.arduino.cc/built-in-examples/digital/Debounce
  long ms = millis();
  byte request = digitalRead(BUTTON);

  if( last_cycle + cycle < ms ){
    // automatic cycle - allow pedestrians to pass
    Serial.print("Give way to pedestrians (cycle)\n");
    stopVehicles();
    pedestriansCycle();
    startVehicles();
    req_state = 1;
    last_cycle = millis();
  } else if( request == 1 && (ms - debounce_delay) > pedestrian_req ){
    // some pedestrian touched the button
    Serial.print("Give way to pedestrians (manual)\n");
    stopVehicles();
    pedestriansCycle();
    startVehicles();
    req_state = 1;
    last_cycle = millis(); // reset the cycle so it doesn't trigger right away
  } else if( request != req_state ){
    // debounce protection
    pedestrian_req = ms;
  }

  req_state = request;
}

/**
 * Function to start the transiction to vehicles red light
 * (green -> yellow -> red) with 1 second delay
 */
void stopVehicles(){
  delay(1000);
  digitalWrite(CAR_GREEN, LOW);
  digitalWrite(CAR_YELLOW, HIGH);

  delay(1000);
  digitalWrite(CAR_YELLOW, LOW);
  digitalWrite(CAR_RED, HIGH);

  delay(1500);
}

/**
 * Turn vehicle traffic ligth green (no delay)
 */
void startVehicles(){
  digitalWrite(CAR_RED, LOW);
  digitalWrite(CAR_YELLOW, LOW);
  digitalWrite(CAR_GREEN, HIGH);
}

/**
 * Activate the green light to pedestrians.
 * Traffic light turns greeen for 5 seconds and then issues 5 beeps telling the
 * light is about to turn red.
 */
void pedestriansCycle(){
  digitalWrite(PEDESTRIAN_RED, LOW);
  digitalWrite(PEDESTRIAN_GREEN, HIGH);

  delay(5000);
  blinkLigths(PEDESTRIAN_GREEN, 5, 400);
  digitalWrite(PEDESTRIAN_GREEN, LOW);
  digitalWrite(PEDESTRIAN_RED, HIGH);
  delay(2000);
}

/**
 * Blinks a given light for a determined number of times
 */
void blinkLigths(byte light, byte times, int duration){
  for( byte i = 0; i < times; i++ ){
    digitalWrite(light, LOW);
    tone(BELL, NOTE_A6, 1000/2);
    delay(duration);
    digitalWrite(light, HIGH);
    delay(duration);
    noTone(BELL);
  }
}
After uploading the code, the vehicles traffic light should start green, while the pedestrian traffic light should be red. Try to push the button or wait 10 seconds, and follow the sequence:
- Car traffic light turns yellow, then red
- After 1.5 seconds, pedestrians traffic light turns green
- After 5 seconds, pedestrians traffic light starts blinking while issuing an audible alert (if a buzzer is installed)
- The pedestrian traffic light turns red while the car traffic light turns green
This sequence repeats ad eternum.
Remarks
If you notice, the read of the push button is done in a different way you generally see on other tutorials. Because Arduino’s digital ports are very sensitive, just by touching the wires you can cause a change in the current (mA), making Arduino think you pushed a button. In the code we’re using the Debounce technique to avoid this problem.
Debounce goal is to check the button is pressed continously during a short period of time (800 ms in the code above). This means the button will not be activated by a current change: we need to press the button for at least 800ms to activate the trafic light sequence. This delay can be adjusted on the debounce_delay variable. Read more: https://www.arduino.cc/en/Tutorial/Debounce
This tutorial was improved resulting of a question I received by e-mail about the traffic light automation. On the previous version, the traffic lights only changed on-demand. On the new version, the traffic ligth changes automatically or by pushing the button. You can check both old (semaforos-antigo.ino) and newer (semaforos2.ino) versions on the archive in Downloads section. The schematic is the same for both versions.